Our file specifications can be found here
We highly recommend sending your files as a .PDF, .AI or .PNG. However, you may also send them in the following formats: .JPEG, and .PSD
Please try to send your .PDF with embedded or outlined fonts. PDF’s are much easier to deal with and will most likely speed up your turnaround and avoid delays. Please remember to flatten your file(s) prior to uploading them.
Please ensure the resolution is set to 300 DPI.
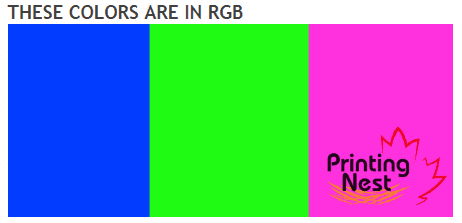
If you forward us an RGB file, there is a high chance that a colour shift may occur, and you may not be satisfied with the result of your job.
Please try to ensure that your begin and end your designs in CMYK colour mode.

No, you should flatten your image before sending it to us (unless we are assisting with the design layout). Please see our specifications page.
If you’d like your artwork to have a bleed (extend to the edge) then it must extend past the cut line as it will be trimmed from the product during the cutting phase. Please keep all text at least 0.125” inside the cut line.
The bleed for standard products such as business cards, brochures and flyers, postcards, etc. is 0.125”.
The bleed for booklets and presentation folders is 0.25”.
For large format prints, the bleeds vary so please visit Large Format FAQs for more information. Generally everything must be tucked in at least 1.00”.
Yes, we do accept borders on jobs. However, if the border is close to the cutline then it is possible to be cut off-center. Please keep your border inside the safe zone to avoid disappointment.
Before placing your order, please check the 3D rotation of your files to ensure that they will be submitted correctly. For files not set up properly, we will use our best judgement and will not be responsible for any mishaps.
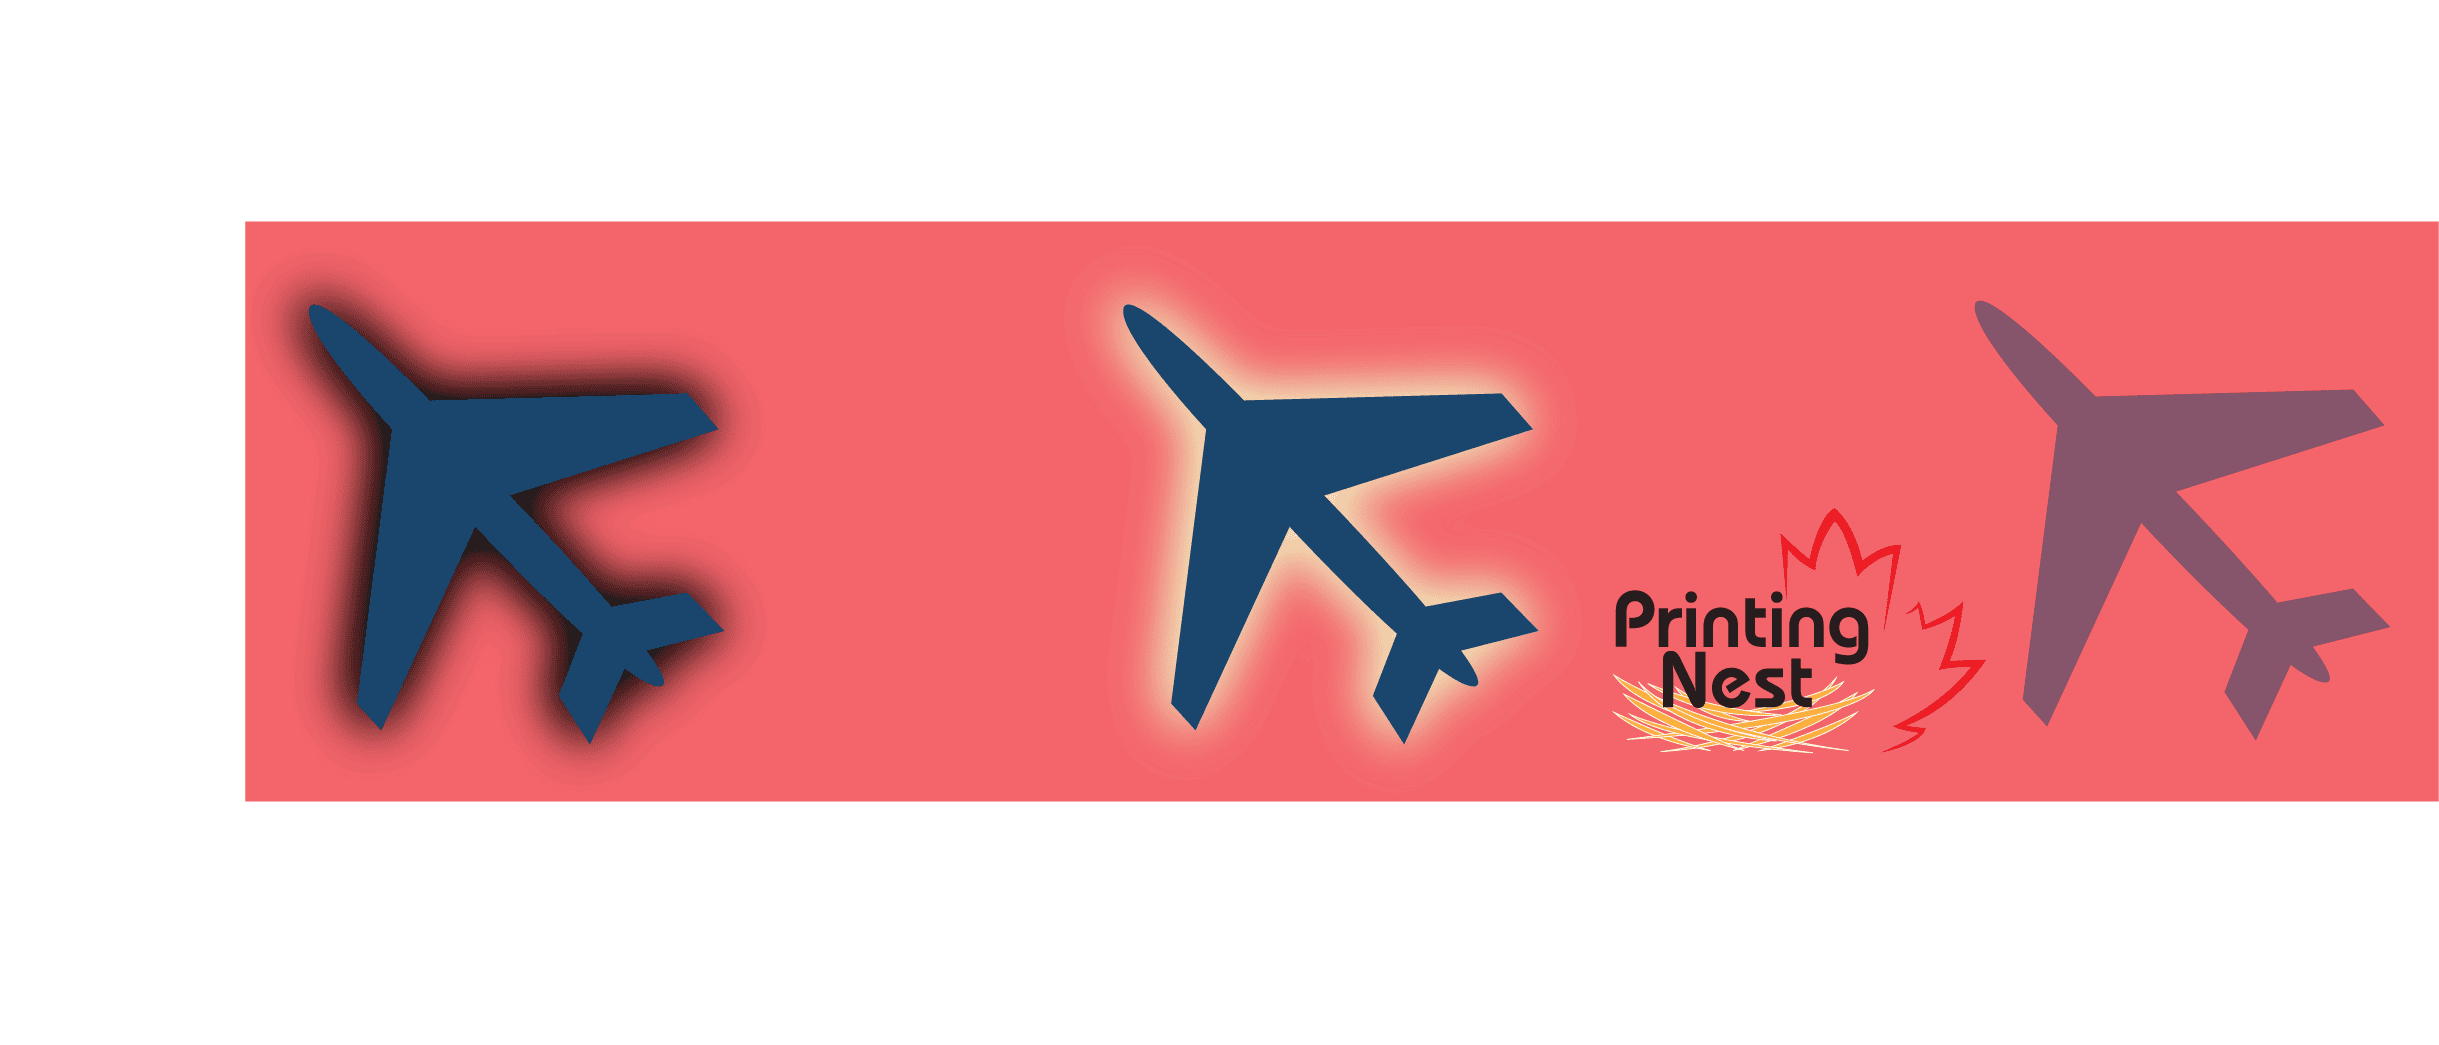
Transparency issues should be resolved before saving and submitting your files to us. In order to prevent such issues it is important to not use shadows, glows, or an image(s) with transparency. Below you can find examples of shadows, glows, and transparency.
Please only submit your print ready artwork in order to avoid any confusion and misprints. We will not be responsible if the files you sent in as samples or proofs are printed in lieu of original files you wanted to send in.
It is highly recommended to turn overprint objects to off before submitting your ready print files to us. Please always double check your artwork before sending it in.
No, please do not submit the front and back in the same file. Please separate the front and back in two different files. If you do not separate the files, delays may be caused if we request new files from you. Please also separate the different pages of your .PDF files for products like booklets.
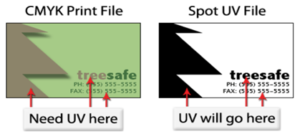
When submitting a spot UV job, please include a separate file which will be used to show where the UV coating needs to be applied. For the best result, we highly recommend submitting a vector file to indicate where the spot UV is to be applied. Please only use K 100 to indicate where the spot UV should be applied. Please see the example below for a better idea.
This is quite a common error, but here’s a solution: when using blue, simply leave a minimum of 30% difference in your cyan and magenta values.
When exporting to .PDF please convert all your colours to CMYK and set the following:
Please ensure you only have a K value and the rest are set to 0. Alternatively, you can use channel mixer in Photoshop and click on monochrome to adjust it accordingly. Similar settings are available in GIMP as well.
Rich black is C 60 M 40 Y 40 K 100. This will give you a darker, richer black tone.
Cracking of the edges of a business card can occur if the card has high values of dark ink. Usually it only occurs on a small batch of the cards in the run during the cutting phase. We recommend the use of lighter colours.
It is caused if a lot of gradient steps are used in a small area. In other words, going from light to dark in a small area of the print.

Cracking is normal when coated jobs are both scored and folded. For instance, if you have a job which will have UV coating, is folded, and scored, you have a higher chance of cracking.
Please ensure all your pantone colours have been converted to CMYK before submitting your order. If Pantone colours are not converted, then they may look different than what you expect. We will not be responsible for this. Please convert before sending.
If you require Pantone colour matched prints please submit a custom quote request.
Our templates are very easy to use. If using Illustrator, you can use the EPS templates. Otherwise, you may use the .JPG version.

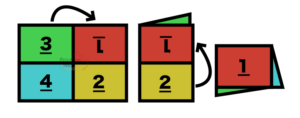
Indicators and definitions will also be in the template files. Please note that some of our templates involving folding will have OUT and IN. OUT means FRONT and IN means the back. Please keep this in mind when submitting your print ready files to us.
All plastic cards are rounded on the corners. Please note the differences between the three types of plastic cards we offer:
White plastic cards – white areas will remain white.
Frosted plastic cards – white areas will become frosted (semi-clear).
Clear plastic cards – white areas will become 100% transparent (clear).
Please keep in mind that there is no white in CMYK so that is why frosted and clear plastic cards will not print white ink. Please also note that prints will come out lighter in colour on the plastic stock. Light scratches may be visible on plastic cards this is simply a norm with them. We always run overs on plastic cards so you’ll have more than what you order! There will be a thin protective coating on the backside side which you may peel off. This helps prevent scratches on the backside.
You can only select one specific foil colour which must be the same for the front and back of the cards. A separate mask file must be provided and all areas to be foiled should be black (100% K). If creating an order with both foil and spot UV then please submit two different mask files to differentiate between the two specialties. Foil and spot UV cannot overlap. It is best to keep them at least 2/16” apart from each other. For optimal results, foil coverage should be less than 50% of the entire side. Up to a 2/16” shift in foil may occur.
Black (100% K) means Inline Foil.
White means no Inline Foil.
15% K means silver.
The advantage of Inline Foil is that you can turn CMYK colours into multi-coloured foils. It works best for lighter colours. It is always recommended to submit vector artwork. Please note if creating a knockout, increase the items in the mask file by 1 point in order to reduce a possible halo effect.
One thing to note about 4D lenticular prints is that they are composed of two to three images which create a swapping effect. In other words, your images will transition from one to another as the card is moved up and down. This 4D effect is only available on the front side of the card and gives the total stock a 21pt thickness. The 4D side has a 75 LPI (Lenticules Per Inch) and images can only be changing vertically. Please add a 0.125” bleed. For best results please note the following: – Dark solid colours and/or backgrounds with textures work great – Bolded sans serif font must be used – Variation from one image to the next should be simple in order to look good – The bolder the text the better – White colours and light colours only work best if they are used in each transitional image in the same exact spot(s) – 4D effect is only available on the front of the card – Back of the card will be full colour (CMYK)
Below are some things to follow:
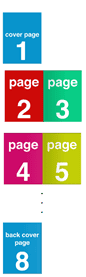
- Page 1 is the cover, page 2 is the inside cover, and so forth
- Please leave a 0.25” bleed and all text inside 0.5” – An 8.5” x 11” booklet with bleed should be 8.75” x 11.25”
- Please submit files as single pages or a multipage PDF
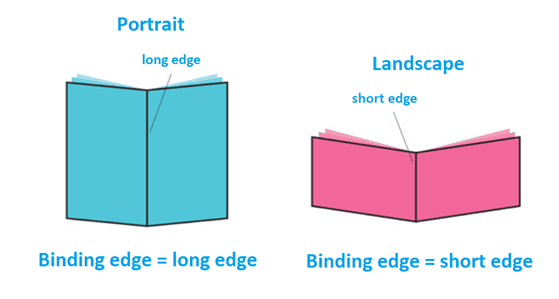
Short edge binding means the book will be printed in landscape whereas long edge binding means it will be printed in portrait. However, short runs of 25 – 200 will only be printed with a long edge bind.
USPS® Every Door Direct Mail® (EDDM®) is an affordable targeted advertising program which allows you to choose your audience by age, income, or household size. You can also choose your desired ZIP Code™ and carrier route.
It’s the perfect solution for any size business because it allows you to target areas across the country without the need to purchase a mailing list. You may select one of two options: print only where we print the required pieces and you handle the rest with USPS, or, our full service option where we take care of both the printing and hand off to USPS. With full service, postage is lower saving you the most!
Please ensure to meet all of USPS® specifications and requirements. We have a built in EDDM full service tool and templates available to make it easy to meet the specifications. Please note that an approved USPS EDDM indicia and return address must be on the mailing piece as well. For more information please visit: https://www.usps.com/business/every-door-direct-mail.htm
Request your EDDM® certified templates by emailing us.
Below is a sample:
Please submit your final files in PDF.
The processing time to complete bundling may not be included in the total turnaround time that you choose when place an order. Ensure that you are adding an extra 1 – 2 days to allocate time for bundling. The band used for bundling varies per facility and is depended on availability. Also, the maximum quantity that is offered for bundling is 25,000 pieces.
It is best to download the roll label template in order to setup your artwork. It is important to leave a bleed of 0.125” and safety of 0.125”. Thus, keep all text inside of 0.25”.
Please note: All roll labels have a 3” core and an out diameter of up to 6”. All Roll Labels are printed digitally so please ensure all images are above 300 dpi.
Roll labels are available in circle, oval, square (rounded corners) and rectangle (rounded corners). Custom shapes are also available.
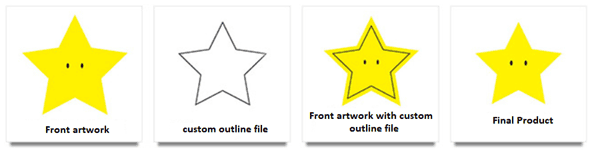
Here is how to setup custom labels:
- Custom outline file must be in vector (EPS or PDF)
- Custom outline file will represent the cut line
- Custom outline file should be a black pile (0.5 – 1pt in thickness)
- We recommend larger shapes for best results
- Please keep in mind there is a 0.125” bleed
Types of roll labels:
Clear BOPP (2.3mil): glossy clear permanent adhesive which is oil and water resistant. White ink is available as a 5th colour. Please note we recommend these for indoor use.
White BOPP (2.3mil): glossy white permanent adhesive that is oil and water resistant. Please note we recommend these for indoor use.
Bright Silver Metallic (2mil): Mirror-like, heat and chemical resistant labels. White ink is available as a 5th colour. Please note we recommend these for indoor use. We also recommend all text font size to be at least 8 points or larger on this stock.
Semi-Gloss Paper (55lb, 3.2mil): Affordable solution that is also a permanent adhesive. However, it is not oil or water resistant. Please note we recommend these for indoor use.
Eggshell Felt (70lb, 6.3mil): Has a very unique texture, high opacity and excellent long-lasting capabilities. Eco-friendly as it contains 30% post consumer waste. Very durable in moist environments. Please note we recommend these for indoor use.
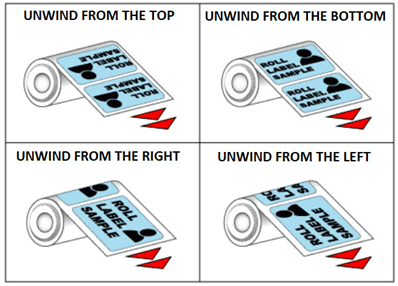
Below are the different unwind directions:
To print white ink:
Please create a mask file similar to spot UV jobs. Whatever needs to print in white should be black (100% K). They must be in vector (EPS or PDF).
Please note that roll labels are safe for food packaging so long as there is an intervening layer of FDA approved food contact material being used. It is the customer’s responsibility to ensure the use of product follows FDA regulations.
Thermal glue is used to bind the pages and cover together allowing for a strong and flexible hold. It allows for a cleaner finish.
Please note: Page count does not include the cover. We do not recommend specifically designing on the spine. Instead, it is preferred to have backgrounds or images which wrap around the book.
Our bumper stickers are Canadian winter certified! We’ve had a few of these on our own fleet of cars and they were able to withstand our harsh winters! Printing Nest’s bumper stickers are printed on 4mil white flex vinyl with an acrylic adhesive that is laminated.
Please note: these are very strong permanent adhesive stickers so removing them is not recommended. We recommend consultation with an automotive professional if you’d like to remove yours. A heat gun is highly recommended in the removal.
Digital envelopes are printed on 70LB opaque stock using digital equipment.
Offset envelopes are printed on offset gang runs and then die cut to be transformed into envelopes.
Bleed requirement is 0.125” which is 0.0625” on each side. Please keep a safety of 0.25” and tuck in all images and text. If you’re printing on more than 40% of the envelope please opt for an offset print.
Please avoid prints where the backgrounds are full colour, instead it is best to opt for a white background with logo(s) and text. If you opt for a window please do not have artwork in that area and make sure all images and text are at least 1/8” away from the edge of the window.
For your reference:
4/0 means full colour on the front
4/4 means full colour on the front and back flaps
0/4 means full colour on the back flaps
Security tint envelopes allow for a pattern on the inside of the envelope distorting the message(s) on the document(s) enclosed. These envelopes will also come with a self adhesive strip.
Please keep a 0.25” bleed and a 0.25” safety. Everything you don’t want to be cut should be tucked in by 0.5”. Please submit a multipage PDF or individual PDFs for each page. Custom booklets, catalogs, and calendars are available, simply request a quote. Since calendars are a bit more complex we will be sending a complimentary proof within 24 hours of placing your order. This will allow you to double check everything before sending to production.
We always recommend using our templates in order to ensure the drill hole does not cut off your text or image(s) in the incorrect area. All drill holes are approximately 0.1875” from the edge and will be situated on the bottom for odd pages and the top for even pages.
We offer black metal coils for our spiral bound calendars. On our 100lb book the diameter of the coil is 0.25” and for 100lb cover it is 0.3125”.
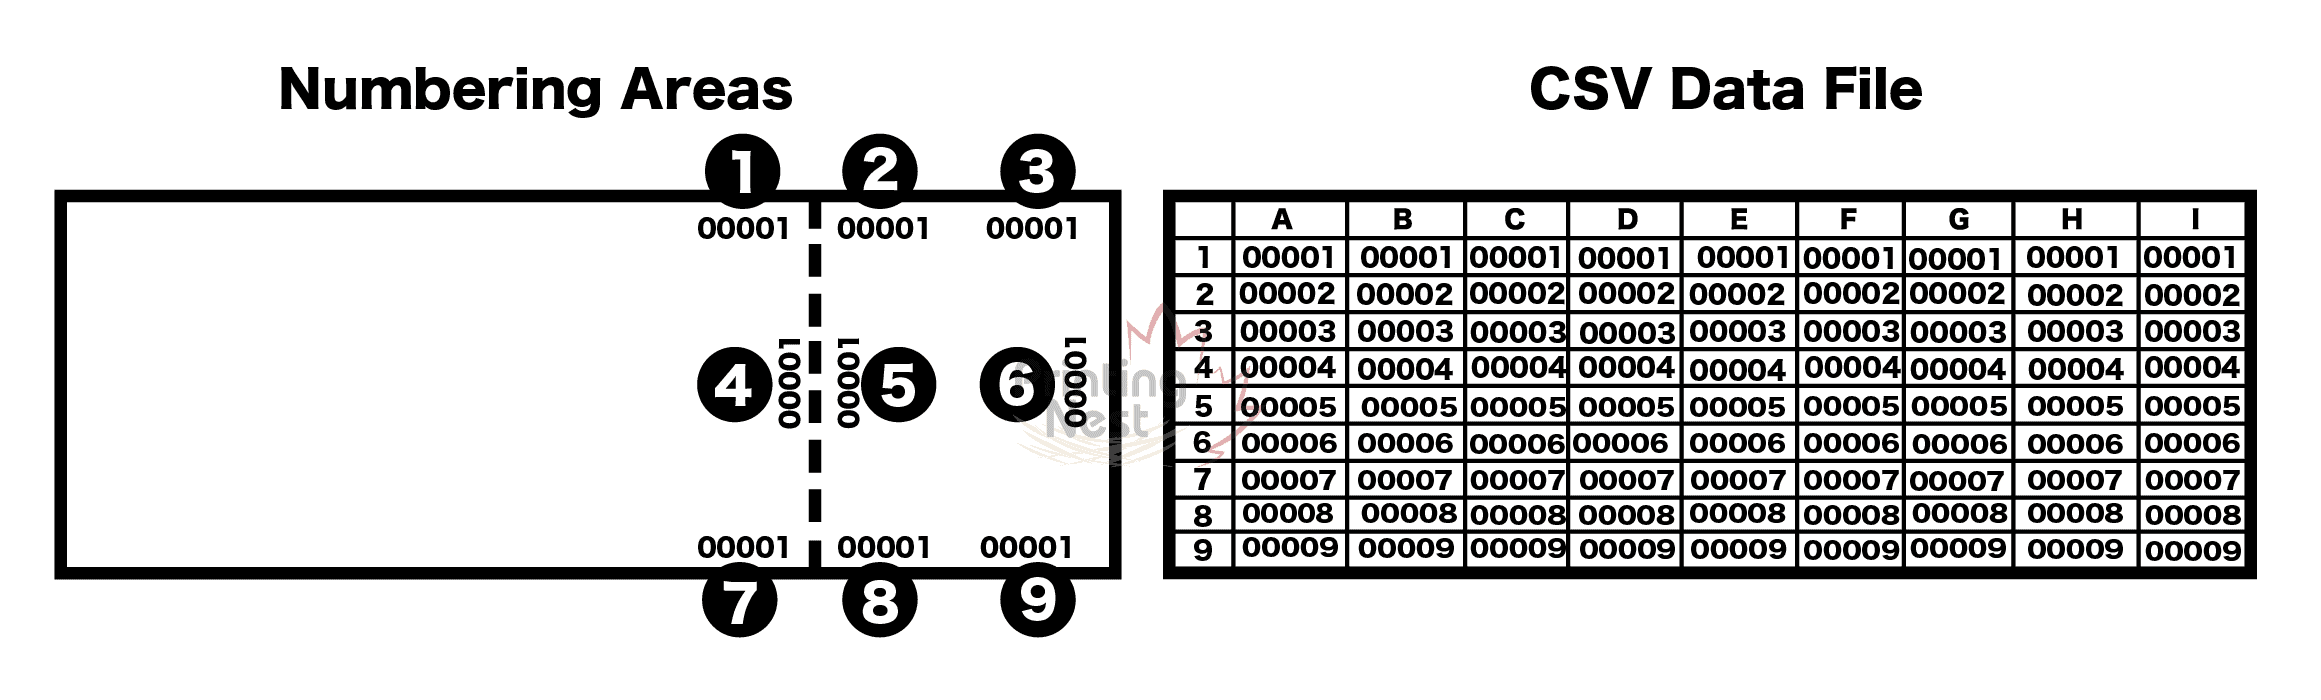
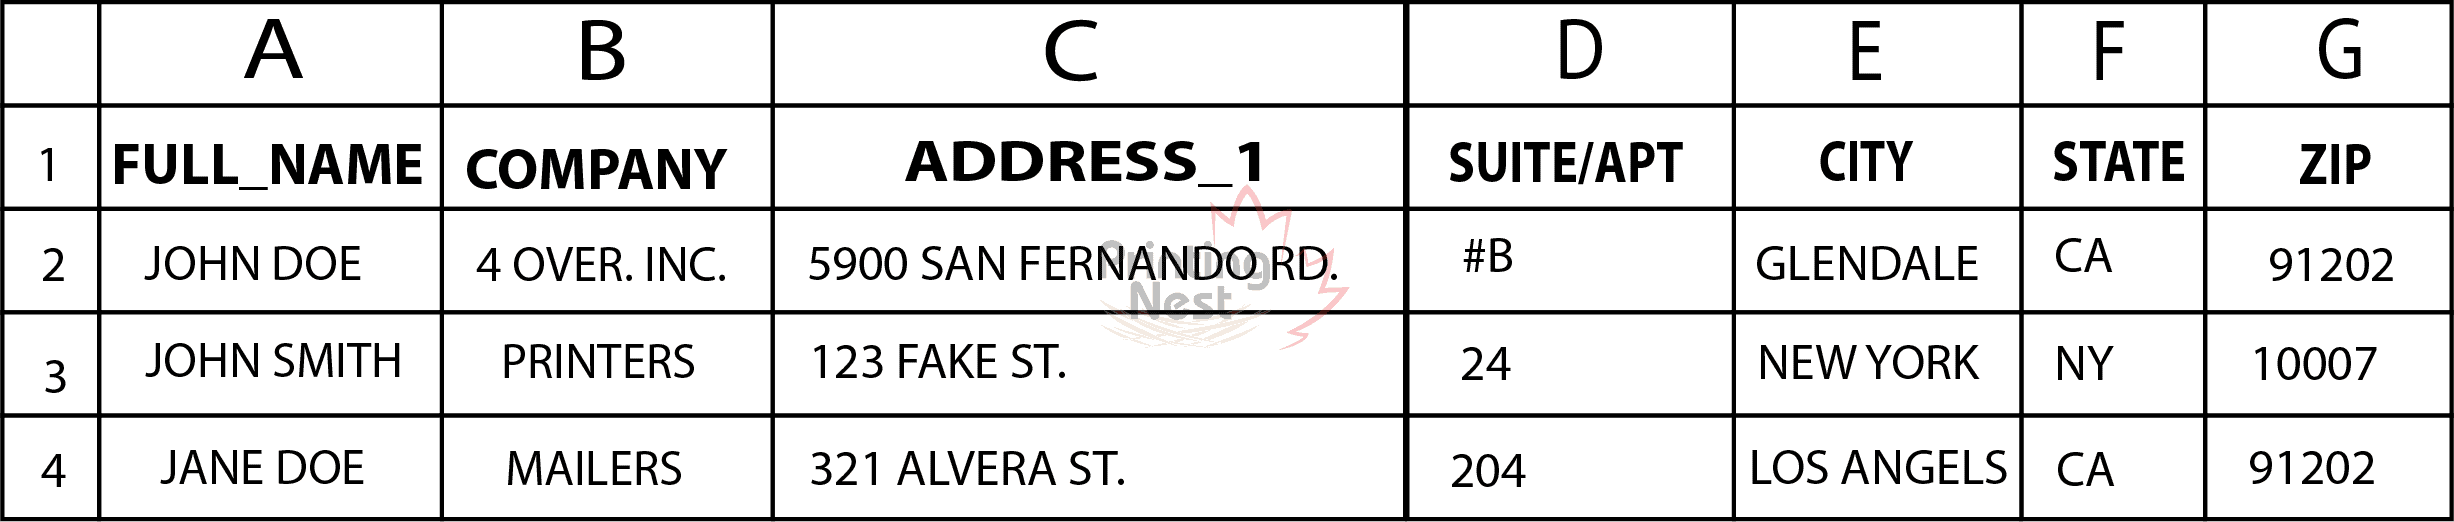
We always recommend using our templates so there are no surprises. We will send you a proof with one address so you can see the positioning within 24 hours of placing your order. Variable addresses are printed in black 12pt or 9pt Arial. Please submit all your artwork in PDF. We do accept jpg and png but PDF is much preferred. Please submit your data in CSV in the following manner:
- Column A: Full
- Column B: Company
- Column C: Address
- Column D: Suite/Apt
- Column E: City State Zip Code
We always recommend using our templates so there are no surprises. We will send you a proof with one event ticket so you can see the positioning within 24 hours of placing your order. For these we use black 14pt Calibri. Please submit your artwork in PDF. Please submit your data in CSV (comma delimited) format.
Please keep a 0.5” bleed on all sides for counter cards. Therefore, 8.5” x 11” turns into 9.5” x 12” when the bleed is taken into consideration. Please note that all counter cards have a 5” easel backing with 3M adhesive.
EDGE Cards are 32pt thick cards with a black coloured core. EDGE Cards are writable. These are very durable cards.
NCR forms are used for invoicing, receipts, packing lists, orders and so forth. NCR Forms are available in 2 part and 3 part with carbonless copy paper. NCR forms are available in full colour or one colour (black). We default to a 14pt Calibri for the variable numbering portion.
Please leave a minimum of 0.25” on the short edge (glued edge). If opting for a wrap-around cover then please keep a minimum 0.75” from the short edge (glued edge).
Please send in your artwork in PDF if possible. For your data/numbers please send in a CSV (comma delimited) file.
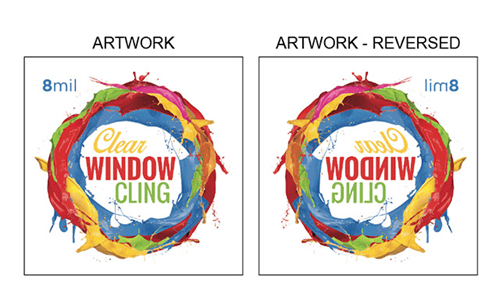
Clear Window Clings are 8mil thick on a glossy stock. These can be used indoor or outdoor. If you’d like to install it from inside, please reverse your artwork. The ideal usage is for POP signage or smooth surfaces. Clings can be reused so long as they remain extremely clean.
In order to print white ink, please submit a mask file with the spot(s) you would like to be in white, in a black colour (100% K). These areas must be in vector format and can be submitted in EPS or PDF.
Install instructions:
Please do not attempt to install the cling if there is excessive heat or cold.
Please thoroughly clean the area of application. Fill a spray bottle with 2% of soap and 98% water. Peel the paper backing off the back of the cling and place the cling on the area of application. Use a squeegee to get rid of the soapy water underneath. It is important to use the squeegee from the center outwards.
Platinum Pearl Cards consist of 100lb cover with 10pt cardstock. This is a very luminescing stock with a silver tint. You can write on these cards but it is not as easy as writing on matte cards.
Brown Kraft consists of 100% recycled material and approximately 30% post-consumer waste. The paper is light brown with flecks. The stock is uncoated but smooth.
Please note: This stock may lead to a slight colour variation due to the type of material. The flecks on the sheet may also vary from one sheet to another. In order to print white ink, please submit a mask file with the spot(s) you would like to be in white, in a black colour (100% K). These areas must be in vector format and can be submitted in EPS or PDF.
Spot UV allows for the selected area to have a high gloss.
Raised Spot UV allows for the selected area to be raised 50 microns and have a high gloss.
We recommend using font size larger than 9pt to ensure it is visible and to not cover more than 30% of the card with spot UV or raised spot UV.
In order to print spot UV or raised spot UV, please submit a mask file with the spot(s) you would like to have UV, in a black colour (100% K). These areas must be in vector format and can be submitted in EPS or PDF.
Hot Foil allows for the selected area to have a foil.
Raised Foil Cards allow for the selected area to be raised 60 microns and have a foil.
We recommend using font size larger than 12pt to ensure it is visible and to not cover more than 50% of the card with spot UV or raised spot UV.
In order to print Hot Foil or raised foil cards, please submit a mask file with the spot(s) you would like to have foil or raised foil, in a black colour (100% K). These areas must be in vector format and can be submitted in EPS or PDF.
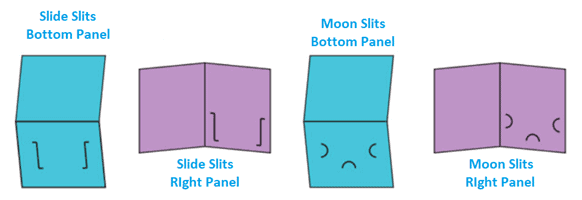
Please note that presentation folders are printed flat, so please use our template for the best guide. Please keep all design(s) and text out of the slit area(s). When submitting your artwork please do not include guide(s) for the slit(s).
It is possible for cracking to occur, especially with jobs that have UV. Cracking is inevitable and will eventually occur from repeated folding. The darker the colours used, the more likely cracking will occur. This is due to high ink density.
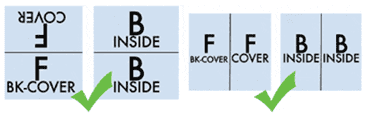
To print on the inside of the folder, please select 4/4.
FRONT = Cover and back.
BACK = Inside of the folder.
Please tuck in all text/images inside by at least 0.25” on each side.
Painted Edge Cards are 32pt and uncoated.

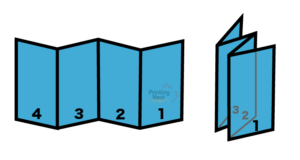
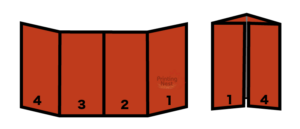
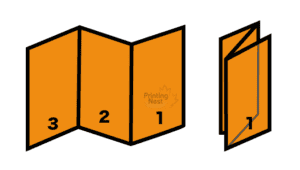
Accordion Fold: One sided print, folded twice to form a w-shape. Come standard in four panels. If you require five panels please send in an email.
Four-Panel Roll Fold: Folded inward from one end, and then inward from the other end multiple times.
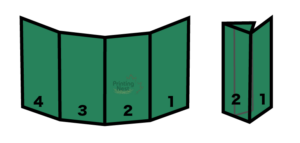
Gate Fold: Both sides of the page are folded into the gutter in an overlapping of the layers.
Double Gate Fold: Single gate fold with an extra fold in the center (four panels instead of three).
Double Parallel Fold: Folded in half and then in half again. Folds are parallel to each other.
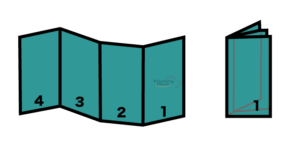
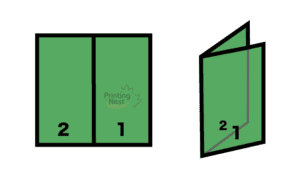
French Fold (also known as quarter fold): Single sided print folded in half, and then in half again as per the example.
Half Fold: Simply folded in half.
Half Tri-Fold: Folded in half and then folded in three.

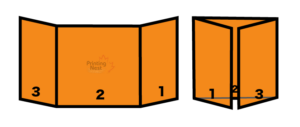
Tri Fold / Letter-Fold / C-Fold: Both panel 1 and 3 (the panels in the side) are folded inwards.

Z Fold: Basically an accordion fold but with three panels. Folded to form a N-shape.
Coroplast, PVC, Foamcore, Car Magnets, Banner Stands or Large Poster:
A 0.5″ bleed is required on all sides. If you are placing an order of a 24” x 18”, the file size should be 25” x 19” to allow for bleed.
Loose Outdoor Banners, Indoor Banners or Canvas Banners:
Ensure there is no bleed or crop marks on the file. Also, make sure that the file size is scaled to the size of the product ordered or is proportional.
If you ordered hems, you should have at least a 2″ safe zone on all the sides to prevent any artwork being hemmed. You should prepare to lose approximately 1/8″ to 2″ on each side of the banner.
Mounted Canvas:
You should have 2 ” of bleed pet side. We recommend using our online templates to ensure precision and accuracy.
Flags:
You should have a 0.5″ bleed setup on all sides. Leave at least 2″ as a safe zone on all sizes as well as the pole pocket region. We recommend using our online templates to ensure precision and accuracy.
Table Covers:
You should have a 0.5″ bleed setup on all the sides. Leave at least a 1″ safe zone on all sides. The table cover includes a sewn 1” hem on all 4 sides using white thread. We recommend using our online template to ensure precision and accuracy.
Polyester Banners:
You should have a 0.5″ bleed setup on all sides. If you are ordering a banner with 24” x 18”, the size of your file should be 25” x 19” to allow enough room for bleed. Stay away from applying borders on your artwork as the product is stretched during the heat transfer process and can result in uneven borders.
It is not always mandatory to scale your artwork. However, scaling your work can make your file more manageable. If you are scaling your artwork, refer to the following:
Vector Art:
Printing Nest is able to print outdoor banners with a maximum size of 150ft x 16ft; however most software’s will not be able to produce a board larger than 228”. Adobe Acrobat and few other PDF readers or converters are able to view a file size with a maximum of 200”. This can be small depending on your artwork and may result in a loss of artwork. Thus, it is better if you submit your files at a smaller scale than the ordered size.
Raster Art:
The raster files will be calculated according to the pixels as opposed to inches. We will then convert the pixels to inches depending on the resolution of a file. The formula equation used for this conversion is pixels divided by DPI = inches. Raster files have a maximum limitation of 30,000 pixels. Any file that has 30,000 pixels set at 150 DPI will be 16’ (200”). Note that if your artwork file is over 30,000 pixels, we highly recommend reducing your DPI or scaling down the artwork.
Resolution & Scale Charts:
Printing Nest automates, expands and constricts file sizes according to the ordered size. The resolution will vary based on the substrate and ink that is used to print the desired product. If you need to scale your artwork, use the following information as a general guide;
Note: Banners that are larger than 15 feet will print below 100dpi
Flags:
Full scale at approximately 150dpi
Canvas:
Full scale at approximately 250dpi
Coroplast and Adhesive Vinyl
Full scale at approximately 200dpi
Foamcore:
Full scale at approximately 250dpi
PVC:
Full scale at approximately 250dpi
Indoor Banners, Car Magnets, Floor Graphics and Large Posters:
Full scale at approximately 300dpi
Table Runners:
Full scale at approximately 200dpi
Adhesive Vinyl:
Full scale at 100 dpi. vector artwork is preferred
For a more comprehensive scale chart:

Yes, borders can look great but can be problematic as all substrates vary from batch to batch. This means making exact cuts is difficult. We recommend staying away from borders in your artwork. Printing Nest will not be reprinting an order that has varying widths. If it is necessary to have a border, ensure that is at least 2 inches in thickness.
Overprint is intentionally used to overlap various inks. This can lead to unexpected or unwanted results. It is recommended to turn all overprint objects off prior to submitting any artwork or files.
In the following example, you can see that the logo is setup to overprint. This causes the colours of the logo to mix with the background. This can lead to unwanted outcomes, so make sure you are double checking all logos and artwork before submitting.
Rich black is a colour made from a specific ink mixture of solid black. This is using 100% K with other additional CMY ink values. This helps you achieve a rich black colour that is darker in tone than the standard black ink.
We recommend using the combination: C 60 M 40 Y 40 K 100 This will help you achieve a very dark, rich black colour.
Products that are printed using the dye sublimation equipment such as 9oz Premium Polyester banner, Flags, Table Covers, Fabric Tube Displays should use the following combination; C 100 M 100 Y 100 K 100
Any images that are gray scale and then converted onto the CMYK scale will likely have a colour shift in the final print. This print may have a shade of green or yellow. To prevent this, double-check the CMYK values of the gray scale in the final document. If there are any other values other than K, there is a chance that the gray scale colour will vary.
To eliminate all values other than the K, you can use a Channel Mixer (adjustment layer) tool in Photoshop. Next, click on “Monochrome” and adjust your values accordingly.
If you are using the colour blue in your artwork, ensure that you are leaving at least a 30% difference in the Cyan and Magenta values.
Since the blue and purple are very close on the CMYK spectrum. You should remember to use small amounts of Magenta whenever you are using large amounts of Cyan. This will prevent the colour from turning purple.
For example: C-100, M-70, Y-0, K-0
If you are sending us a file in the RGB format, it is likely that there will be a colour grade difference. Remember to always start and finish your artwork using the CMYK colour mode. Never use the PMS or Pantone colours.
The following is an example of colours in RGB vs CMYK.
No, it will not. Any amount of transparency can cause issues with the printed file. This is why it is important to flatten your files prior to sending them. You should outline fonts and make sure that the file is correctly in CMYK mode. Printing Nest considers flattening as a basic element of file setup and does not check for this issue. If you are unsure of how to manage transparencies, call Printing Nest before submitting your order.
No, at this time we only accept 1 piece of artwork per order.
With the different versions of Illustrator; there are different presets within the “Save PDF” dialog. The PDF presets within Illustrator will not save the PDF to the required document size if any of the artwork is extended past the edge of the file size. This includes any text or objects, even those that are not visible. This will create a PDF that has an excess amount of white space and of the incorrect size. Remember to double-check this prior to printing as it can cause error on the final product.
For the Illustrator CS2 version and the above; we recommend using the “High Quality Print” preset. We highly encourage you to double check your PDF file for any excess white space and the size before you submit it online.
When you want to print arrows on both sides of the sign and want them to point in the same direction, you have to setup the arrows in opposite directions on the production files. For assistance, please email in.
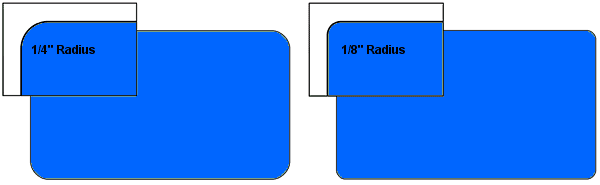
The rounded corner magnets have a radius of 1”. You can view the templates here for the magnets.
Firstly, ensure that your files are in 200 – 250 DPI and CMYK. We also do not require any bleed to be setup; however you will have to consider your own mounting or framing requirements.
The following are a few rules you should remember when finalizing your artwork for the Canvas Banner:
- Do not setup any borders. This is because during the process or mounting or framing, stretching may occur and tamper the outlook of your banner.
- We do not reprint any orders that get damaged during mounting or framing by an outsourced company.
- The artwork should be scaled to the finished size that you desire and remember to include any additional area for mounting or framing.
- Since there are various types of mounting applications and techniques; we do not include any mounting hardware with the Canvas Banner print.
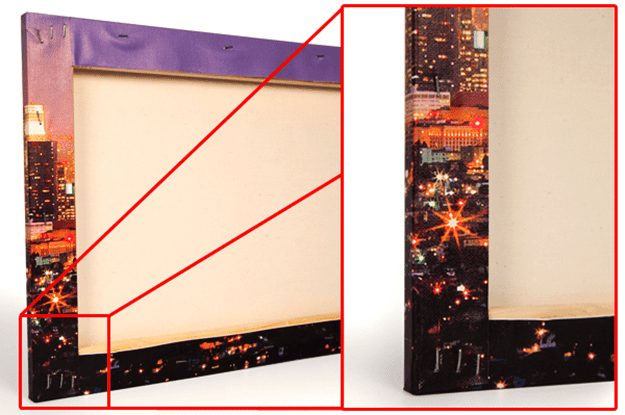
Gallery Wrapped Canvas:
This product will entirely wrap your artwork along all the edges of the stretcher bars; this will make it so you can see the image on the face and sides of the frame.
Museum Wrapped Canvas:
This will use your photo on the front-side of the frame and has a solid colour on the edges. This looks the best if you select a colour for the edges that matches the artwork.
For a Mounted Canvas, the file should be setup as a 200 – 250 DPI and with CMYK colours. They will be printed and then be gallery wrapped using ¾” stretcher bars.
It is required that the artwork follows our online templates. This is a useful tool as it will help you visualize the width of the gallery wrap. The templates can be viewed here.
The following are a few rules you should keep in mind when ordering a Mounted Canvas:
- Do not setup any borders. This is because during the process or mounting or framing, stretching may occur and tamper the outlook of your banner.
- Currently, we only offer gallery wrap for our Mounted Canvas products
- Since there are various types of mounting applications and techniques; we do not include any mounting hardware with the Mounted Canvas Banner print.
The following is an example of a Gallery Wrap:
Yes. All submitted files should be 8 bits per channel.
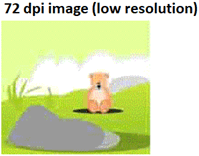
Raster artwork including photos or flattened artwork from Adobe Photoshop is derived of small squares also known as pixels. This depends on the resolution that you desire, which can have a low quality result if it is derived of fewer pixels. The raster elements that you require should be setup to have a high resolution (DPI) before transferring them for your large format product.
The vector based artwork includes illustrations or any clip-art style elements from Adobe illustrator. This is done using mathematical calculations that are scaled to the desired size without decreasing the quality. Remember that any effects that are done using Illustrator will have raster and transparency, which can increase the size of the file. You should also have the required settings setup correctly in the “Document Raster Effects Settings”. If you wish to achieve a photo-quality print on the 36” x 48” and do not alter the raster effects from the 72 DPI, this may result in being able to see small squares in the drop shadow versus a smooth shadow.
It is not mandatory, but we highly recommend using Adobe formats, especially PDF files. If you used a program other than Adobe, you should export the artwork in a .PDF, .TIF or .JPG file format before submitting it online.
No. we only print using the 4 colour process also known as CMYK. If you are using Spot or Pantone, you should convert them CMYK prior to printing to avoid any error.
At Printing Nest, we use the #2 Grommets, they are 3/4″ and have a brass colour. The Grommets are precisely placed on all 4 corners of the product and are placed 2ft or 1ft apart depending on the needs of the product.
We offer sewn hems and also use a hold air welding system that is much more functional and stronger than the traditional hem.
The file sizes are often very large and can take longer if the file is larger. You should ensure your network connection is also working properly to speed up the upload process.
You can seek various different programs or companies that can help you convert your raster artwork to vector. Do a quick Google search to find the best company to help you accomplish this task!
Many printing companies aim to run multiple print jobs on a single sheet. At Printing Nest, we utilize the maximum amount of square inch of a sheet by imposing various jobs together; which disperses the fixed cost of a job. We then pass the savings onto you to help you save hard-earned money as well!
After using your banner you should store it in a cool and dry place to maximize its usefulness. If you have an outdoor vinyl banner, it is likely that it will get dirty so clean it regularly and carefully. The most effective method to cleaning your banner is by laying it flat on the ground on a safe, clean area such as a table or floor. Begin by using a mild dishwashing liquid and lukewarm water to rinse. Stay away from using harsh chemicals or petroleum-based cleaners. Make sure it is dry before you store it away for future use as any wetness can cause mildew and ruin the banner.
Store the banner away by rolling it up so the image is on the outside, to prevent the print from cracking. Also, do not roll the banner extremely tight or loose as it should have a good amount of breathing room while it is stored away. Place the banner in the box and store it flat on the ground and not vertical to prevent any wrinkles.
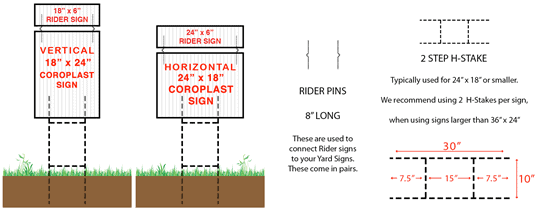
2-Step H-Stake: This is usually used for 24” x 18” and smaller. Any signs that are larger than the 24” x 18”, it is recommended that you use 2 separate H-Stakes. The wire gauge size that we offer for our H-Stakes is of 9 gauge.
No, we do not offer any colour matching.
The magnets may not always be delivered to you flat, which is why we recommend laying them out on a flat surface in the sun for a few hours before application. This will help minimize any moisture that may have been absorbed during shipping. This process will also help your magnets stay flat upon application. You may choose to store them in a flat box within your home and only handle them whilst applying or cleaning. It is also important to clean the magnets as well as the portion of the car door must be free of all oils, dirt or dust. You can clean the magnets using a soft cotton cloth with only water and no harsh cleaners. Do not stand the magnets upright as this can cause them to wilt over time. With proper care, these magnets can be long lasting.
We highly recommend seeking professional help for installation of all products. Also, remember to take into account the location of the product placement and any environmental stresses that may impact the product such as outdoor weather. Printing Nest will not be responsible for any damages that result from improper installation or care. We do however provide installations services across North America.
The wall graphics are kiss cut and have a paper backing. Once you are ready to apply, you can remove the paper backing and place it on the surface you select. However, these are best applied on smooth, clean surfaces such as glass, walls, desks or even laptops. Clean the surface thoroughly to ensure proper application, as a dirty surface may stick to the low-tack adhesive and reduce the amount of times you can reuse it.
You can also clean the Wall Graphics using a dampened soft cloth. Do not use any soap or harsh cleaning agents as it can damage the prints. Do not clean the adhesive backing, as it will prevent the graphic from sticking to surfaces. Wall graphics should not be used outdoors or on vehicles.
No, we do not use any archival media or inks for any of our prints at Printing Nest.
Any climactic changes such as temperature, humidity or environmental changes can cause the mounted canvas to be stretched or begin torqueing. The stretcher bars are wooden and can be impacted with humidity. You should aim to store your stretched canvas print in a controlled environment to prevent any torqueing from occurring. However, these issues are typically more likely in areas near large bodies of water as humidity levels adjust consistently.
The banner may be produced in various pieces and can be seemed together depending on the size or other important production variables. This factor of production is based on the discretion of Printing Nest.
A rider sign is made from 4mm Coroplast and is made to sit above the standard Coroplast sign using an 8” metal rider pin. Remember that the rider pins are optional. Similar to the standard Coroplast signs, the Rider Signs also have corrugated flutes that cause a linear effect. The inks that are use are UV cured and dried.
Note that for the bleed, you should have 0.5” on all sides of the artwork with no crops.
The blockout vinyl is made of an opaque material that prevents any sunlight from passing through, and it is also not transparent when viewing from the back-side. This product is more functional and durable than the 13oz Banner. This material also has a low curl, which allows you to store it in a tube without damaging the banner. You can use Blockout Vinyl for any banners that require opacity.
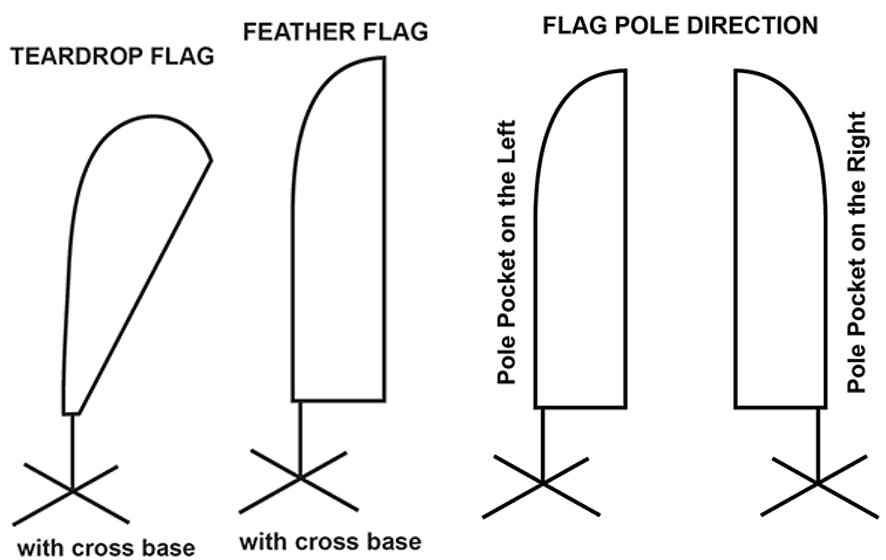
To setup the artwork for the flags see below: You may also use our online templates here to ensure proper setup.
Feather or Teardrop Flags: The text or graphics should be at least 0.5” away from the edge of the hem to prevent it from being hemmed over. The artwork is able to be wrapped around the pole, but ensure that you are not keeping any of the important text or art on the pole pockets, hem or seam.
Note that for the bleed, you should have 0.5” on all sides of the artwork with no crops.
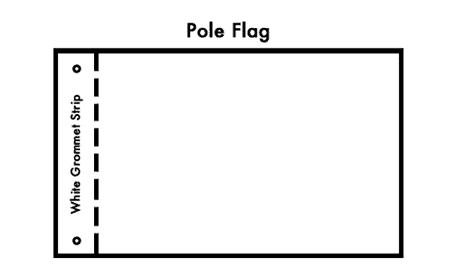
Pole Flags: The text or graphics should be at least 0.5” away from the edge of the hem to prevent it from being hemmed over. Printing Nest professionally hand sews hems of 0.5” around the pole flag.
Note that for the bleed, you should have 0.5” on all sides of the artwork with no crops
Flags are printed using a high quality dye sublimation process and are printed on a lightweight 3oz polyester material. If you order a pole flag, it will have a reinforced grommet strip on the right or left side of the flag and will be made of canvas. This is done to increase wind resistance. The flag material is approximately 1.5 – 2 feet shorter than the total height of the flag. The flags are also flame resistant but avoid exposure to open flames or extreme heat. We offer three different types of flags including feather flags, teardrop flags and a pole flag. Refer to the images below. Assembly of the flags is required. You have the option to select white or black thread for the hemming of the flags.
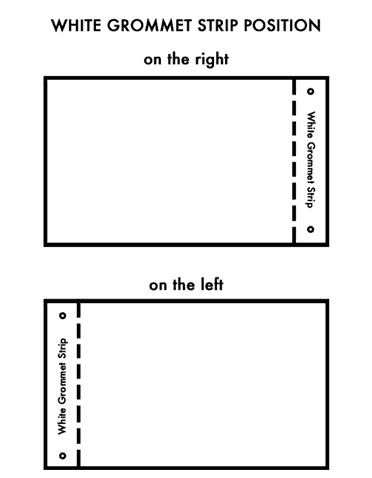
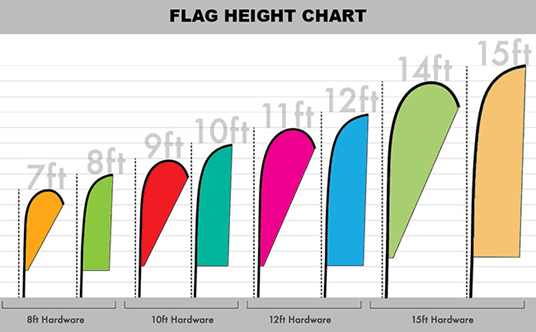
The feather flag comes has two versions. One is the Feather Flag Jumbo, which is 34” wide and the Feather Flag Regular is 29” wide. Remember to check what side you want your pole pockets on, to make sure it is correct refer to the images below. You can also select the grommet strip position of placement on the right or left side.
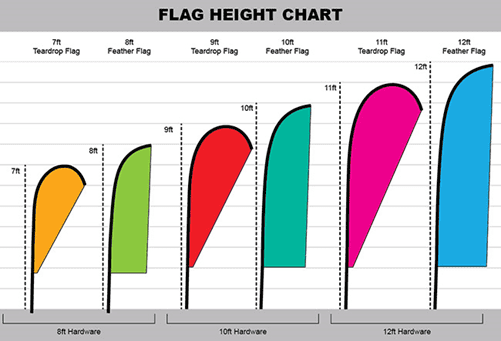
The hardware that is available with the flags is listed below. You are also able to use the same flag pole or hardware with a different flag size. To do this, refer to the chart below.
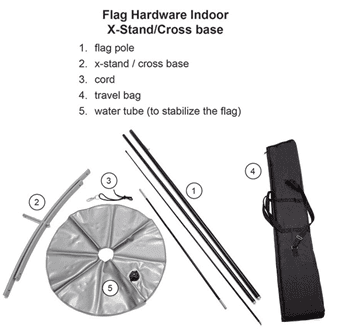
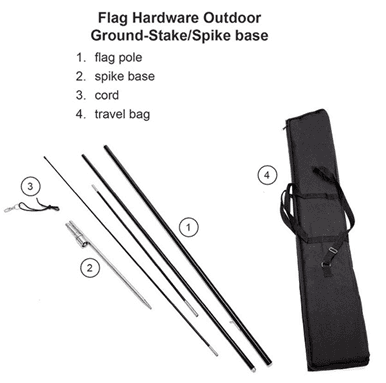
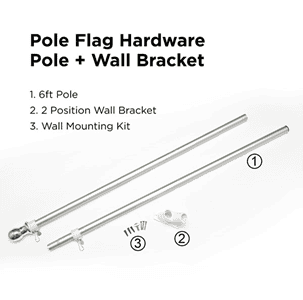
Yes, you can order the parts individually within the marketplace category online.
This product is made from a very durable 24pt board stock and has a polyethylene coat on both sides. We recommend using this product for short periods of time as poor weather conditions; excessive heat, cold or moisture can impact the lifetime of the product. The Polyboard Yard Signs are 22” x 28” and are scored so they fold to a size of 22” x 14”.
To setup the artwork for the Polyboard Yard signs, we high recommend using our online templates. Ensure that the artwork is setup with no bleed or crops. Remember to scale the artwork exactly to the size that you wish to order. The signs are pre-scored and are ready to around the U-frame. After the product is folded, it can be stapled on each side with any medium to heavy duty staples to secure it firmly. You may also glue or tape them together.
You may choose to select U-Frames. These are 9 gauge zinc plated steel wires that are U-shaped and are used for Polyboard Yard Signs. These are most effective for areas with soft ground such as grass, dirt or soil.
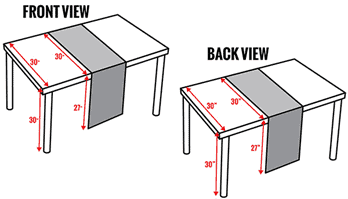
We recommend using our online templates for the Table Runners or Table Throws. Setup your artwork with a 0.5” bleed on all 4 sides and have a 1-inch margin from the edges to prevent any artwork from being cut off. For example, if you wish to order the 30” x 84” table runner, the image area should only be 28” x 82”. Do not add any crops onto your artwork. You have the option to select white or black thread for hemming.
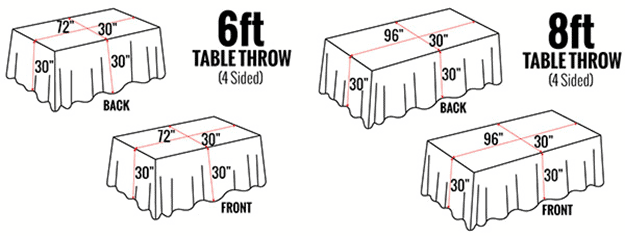
A 6ft Table Throw will fit a standard 6ft table with dimensions of: 72” x 30” x 30” .
An 8ft Table Throw will fit a standard 8ft table with dimensions of: 96” x 30” x 30”.
A 3-Sided Table Throw will cover the entire standard size tabletop and will have a 30” drape on the front, left and right sides. The back will have an 8” drape. This is also known as an open back. Refer to the image below.
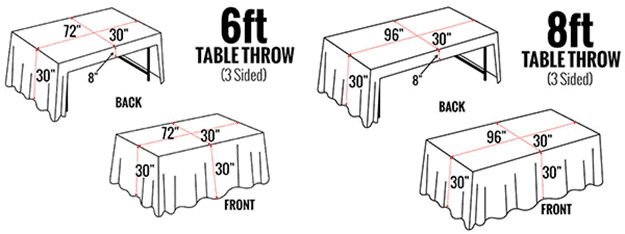
A 4-sided table throw will cover the entire standard sized tabletop and will have a 30” drape on each side. This is also known as a Closed Back.
We print the table throws using high quality sublimation equipment on a premium 9 oz polyester. The table covers can be used multiple times and are machine wash safe. Use cold water with a mild detergent on a gentle cycle. Tumble-dry low to prevent shrinkage. Steam if needed to ease any wrinkles. The polyester is also flame resistant but keep away from open fire or very high temperatures.
The material used for Window Clings is an 8mil thick, clear glossy material that has a paper backing and can be peeled upon application. Window Clings are multi-functional and can be used outdoors as well as indoors. These can be easily used for any POP signage on glass or any other smooth surface. Make sure that you are cleaning the surface thoroughly prior to application. Areas that are too cold or warm can prevent the cling from sticking to the surface effectively.
To setup a clear window cling with white ink:
You can use white ink as an overprint for the Clear Window Clings to increase opacity and vibrancy of the print.
This is done similar to the Spot UV masks as the White Mask files remain separate from the artwork files and the block colour will indicate the areas where the white ink will print.
Remember to ensure that you create your mask the same size as the final colour art file. This will decrease the likelihood of any alignment issues from occurring during the print process.
Note that white masks must be made in the vector format and should be saved as a PDF or EPS file and be 100% K.
The following are a few rules you should keep in mind when creating a white mask:
- The white ink base is going to printed behind all the selected colour in your artwork layer
- The portion with colour but without a white mask will be directly printed on a material. These areas may be slightly more transparent as they will have a clear substrate background.
- The areas that have colour with white mask are going to be opaque or be of a solid, rich colour.
- Any areas that are left white, with no colour overprint will be printed as white
- The black that is on the white mask file must be 0%C 0%M 0%Y 100%K, or it will not be recognized by the preflight.
- If the Clear Window Cling is meant to be viewed from outside, you have to reverse the artwork before submitting. For reference, see images below.
To install a window cling:
Begin by properly cleaning and drying the surface that you wish to apply the window cling. You this by putting soapy water in a spray bottle; the ratio should be 1% water and 99% water. Carefully remove the paper backing hold the backing steadily to prevent it from folding over itself. Place the backing that was against the surface and apply to window. You can use a squeegee or a credit card to remove any bubbles or water. Apply a motion from the center and move outwards. You may spray a bit more soapy water on the backside to lubricate the surface when you are removing air bubbles.
This is an adjustable backdrop or step and repeat banner stands. All the stands can be adjusted 5 – 10 feet horizontally as well as 3.5 – 8 feet vertically. We offer a 96” x 96” (8ft x 8ft) 13oz scrim vinyl banner with a 4 inch pole pockets that are placed at the top and bottom of each stand. The hardware will also be able to be purchased separately through our website. These are compatible with substrates that have 4-inch pole pockets at the top and bottom.
It is required that the artwork file is submitted with no bleed or crops. The file should also be 96” x 96”. Also, the file should be 150 DPI at the full scale.
The size of the Telescopic Backdrop banner stand while assembled, are able to be adjusted 5-10 feet horizontally or 3.5 – 8 feet vertically. When the banner is disassembled, the stand can easily fit into a carry bag that is approximately 40” x 9” x 3”. You can use a banner as small as 5ft x 3.5ft up to one that is 10ft x 8ft that has 4″ pole pockets on the top and bottom.
The Banner and its allocated stand will be shipped separately. The banner stand will be shipped with its Canvas Carry bag and the banner will be shipped using a square tube box.
The 2” pole pockets have a 1” circumference and are able to be used with the 1” diameter poles. The 4” pole pockets have a 2” circumference and can be used with a pole with a 2.5” diameter pole.
An A-frame sign is a stand that is a similar shape to the letter “A”. These are multifunctional and are able to be used indoors and outdoors. This product includes a 24” x 18” double-sided 4mm White Coroplast sign. You may also separately purchase a 24” x 6” 4mm double-sided Rider Sign through our online website. The colour of the A-frame is black.
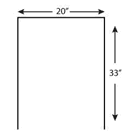
The file format for the artwork requires being setup with no bleed or cropping marks. Ensure that your file is proportional to 24” x 18” or scaled to the product ordered. The file may be 200 DPI at full scale. The dimensions of the A-frame is 33”H x 29” W x 2”D. the total weight of the frame is 12lbs.
This product is printed individually using the high quality dye sublimation process. It is printed on a 9 oz premium polyester fabric. The fabric is then sewn together, which creates an eye-catching double-sided display. These Fabric tube displays are also interchangeable and if you would like to only order the fabric; you must select “None (Fabric Only)”. If you select this option we will send a printed, sewn fabric replacement.
It is required that the file be sent in a PDF format and is setup with a 1” bleed on all sides. For example, if the finished size of the file is 24”x 90”, it should be setup with a 26” x 92” bleed.
The weight of the fabric tube displays is:
Stand Size: 24” x 90” Carrying Case: 34.5” x 10.5” x 2.5” Weight with Fabric: 14lbs
Stand Size: 36” x 90” Carrying Case: 38.5” x 11.5” x 2.5” Weight with Fabric: 18lbs
To install your fabric tube display you simply need to connect the stands’ poles together by pushing the locking mechanism downwards. When it is locked securely, the mechanism will pop out. Lastly, screw the ends of the poles into the base securely for stability. Once the base is completed, you can simply slip the fabric over the frame to have the display ready for use!
The event tents are effective for any large-scale marketing as they are eye-catching at all social events. These are printed using a UV Ink Technology on a white 11oz water-resistant fabric. An event tent is made of 4 fabric panels that allow you to include up to 4 different designs (1 on each panel). All the panels will then be carefully sewn together and setup onto a 10’ x 10’ aluminum pop-up canopy tent. Remember that the tent fabric material is only available in white.
The event tent will be shipped to you in two boxes. One will contain the installation hardware, which weighs approximately 40lbs and has a measurement of 63” X 10.5 x 10”. The second box will consist of the tent fabric and weighs 12lbs with a measurement of 25” x 19” x 2.25”.
Setting up the file for the Event Tent:
It is required that the graphics and text is place at least 0.5” away from the edge to prevent it from being cut off. You should also have a 0.5” bleed setup on all sides of the artwork with no crop marks. You are able to use different artwork for each of the panels and must upload all the 4 different designs. If you wish to use the same image for all panels, you must still upload the image for all 4 panels.
Tent Installation:
The frame for the tent is simple to assemble, as it can be setup in only 10 minutes. However, it is best if 2 people are assisting installing the tent. The fabric is separate from the frame and is also removable.
If you need to clean your tent we recommend using a soft cotton cloth with a mild dishwashing liquid. Use lukewarm water to gently rinse and clean any dirt. Stay away from harsh chemicals and fully dry each side before storing away.
The processing time to complete bundling may not be included in the total turnaround time that you choose when place an order. Ensure that you are adding an extra 1 – 2 days to allocate time for bundling. The band used for bundling varies per facility and is depended on availability. Also, the maximum quantity that is offered for bundling is 25,000 pieces.
You must complete the Non-Profit 3623 Form and ensure all information is correct. You can access the form here.
This should include the Non-Profit organizations name and address. The Organizations name must match the information on 3623 Form.
- Presorted Standard – Minimum 200 pieces
- Non-Presort First Class – Minimum 200 pieces
- Non-Profit (Standard) – Minimum 200 pieces
- Presorted First Class – Minimum 500 pieces
We can provide inkjet on paper that does not have a UV coating on the address block and postage side.
- 100lb Book
- 100lb Cover
- 4/1 14 or 16pt
- 4/4 Spot UV or UV Front
- Matte 14pt or 16pt
- 70lb Bright white
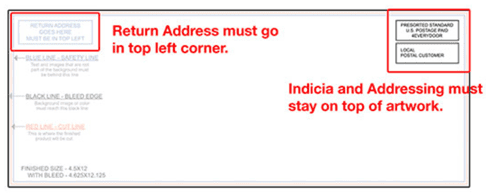
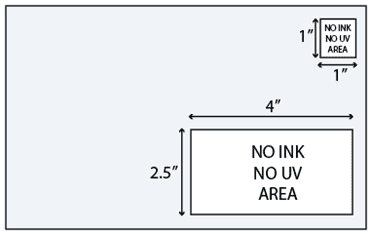
Yes, you must have 4″ x 2.5″ of blank space located on the bottom right corner for the address and barcode. Also, 1″ x 1″ of blank space located at the top right hand corner for the indicia/permit.
- Data process of one mailing list ($25 for each additional list)
- A.S.S. Certification (Coding Accuracy Support System)
- C.O.A (National Change of Address)
- De-dupe list
- Pre-sorting
- Inkjet setup and addressing
- Post Office delivery
This is a proof that is emailed to you after we receive the complete postage payment and the print is completed. The proof includes the indicia and a random name that is selected from the customers’ mailing list at random. This is done to show the placement and the indicia are used to indicate the mailing class.
The mailing turnaround only begins once we receive the PAMF. If the PAMF form is submitted before the 1 P.M. (P.S.T) deadline, it will be the first day of turnaround. The following lists the standard turnaround times for data processing:
200 – 25,000: 1 to 3 business days
30,000 – 60,000: 3 to 5 business days
70,000 – 100,000: 5 to 7 business days
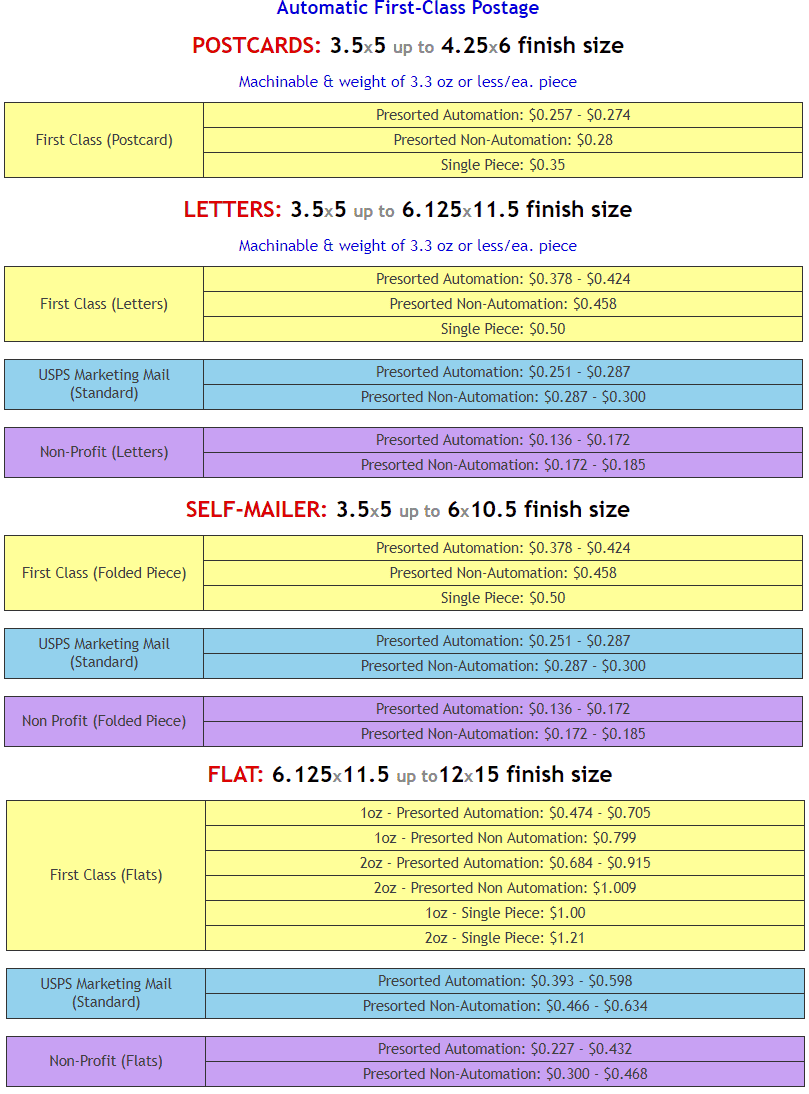
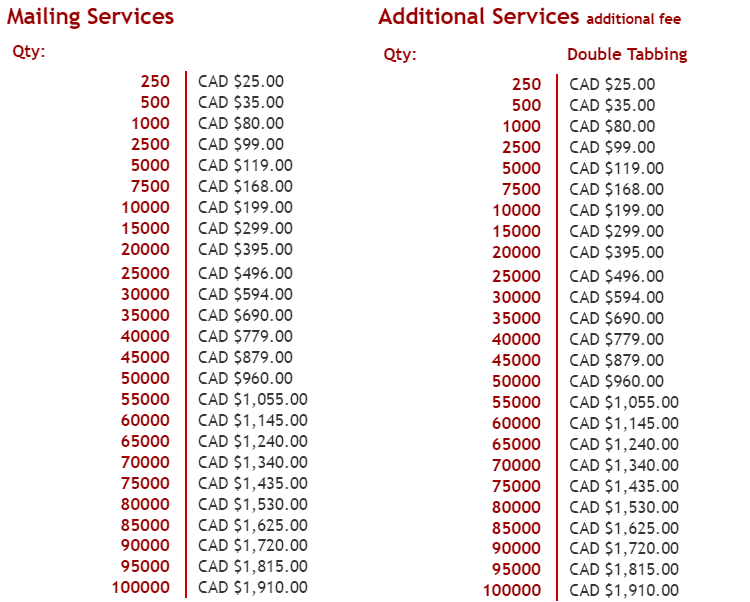
You can find the postage rates on the mailing services site. However, the exact postage costs will be determined after we process your mailing list.
Mailing service charges are calculated when you place your print order.
Postage charges must be paid via cheque or EFT. If you’d prefer to pay via credit card, a 3% processing fee will apply. Please note that by paying via cheque it will slightly delay your turnaround time as we have to wait to receive the cheque before processing. Should you wish to pay via cheque please email a copy to accounting@printingnest.com
Remainders can be shipped back to you or recycled.
No, at this time you cannot use your own permit. You must use ours.
We accept .XLS (Excel), .CSV (comma delimited), or .TXT.
Presorted Standard
- 200 pieces required to qualify for Presort Standard.
- Post office delivery time is estimated two weeks.
- Cheapest postage rate but longest delivery time.
Presorted First Class
- 500 pieces required to qualify for Presort First Class.
- Post office delivery time is estimated 1 – 3 business days.
Non-Presort First Class
- 200 pieces to qualify for Non-Presort First Class.
- Post office delivery time is estimated 1 – 3 business days.
- Non-Presort First Class is the same as placing a stamp on an envelope (no discount).
Non-Profit (Standard)
- 200 pieces to qualify for Non-Profit mail.
- Customer needs to provide proper documentation to qualify for Non-Profit rate. *(PS Form 3623)
- Post office delivery time is estimated two weeks (Same as Presort Standard).
- Uses customer’s Non-Profit account with Printing Nest’s permit number.
Mailing Prices:
These prices are based on the mailing service only. This does not include postage and printing. The mailing service turnaround is 1 to 3 business days, after the PAMF form is submitted and signed. Note that any custom jobs or large quantities that exceed 25k will have an increased turnaround time.
The mailing turnaround will begin after the PAMF is received. The PAMF form must be submitted before 1 P.M. (PST) and will be considered the first day of turnaround. The following is a list of the turnaround times for data processing:
200 – 25,000: 1 to 3 business days
30,000 – 60,000: 3 to 5 business days
70,000 – 100,000: 5 to 7 business days
The Mailing Service will include:
- Data Process One (1) List ($25 ea. additional list)
- C.A.S.S. & N.C.O.A. Certification
- De-Duplicating Address
- Pre-Sorting & USPS documentation
- Ink-Jet Setup & Addressing
- Post Office Delivery
*Pricing in USD available as well.
Questions?
You can contact our mailing department via e-mail at mailing@printingnest.com, or via live chat. You can contact us by phone at 1-844-550-3786 and we will be able to assist you with any mailing concerns.
Mailing Terms and Conditions:
Printing Nest is solely responsible for the data processing and printing only. We do not archive, store, transfer or distribute any mailing addresses that are provided by our customers. The mailing service is only provided for orders that are printed by Printing Nest. The mailing pieces should not have any UV coating on the postage side to ensure proper addressing. Mailing orders must be paid entirely with a PAMF approval before mailing. Postage amounts should be paid by cheque only. All other services should be paid by credit card. Any quantities that exceed 25,000 may take more time than the standard 1 – 3 business day turnaround. All remainder samples are unable to be sent out prior to mailing.
We offer red, white, blue, black and gray. For additional colours, please e-mail in. You can also check out our promotional products website: Printing Nest Promotional Products
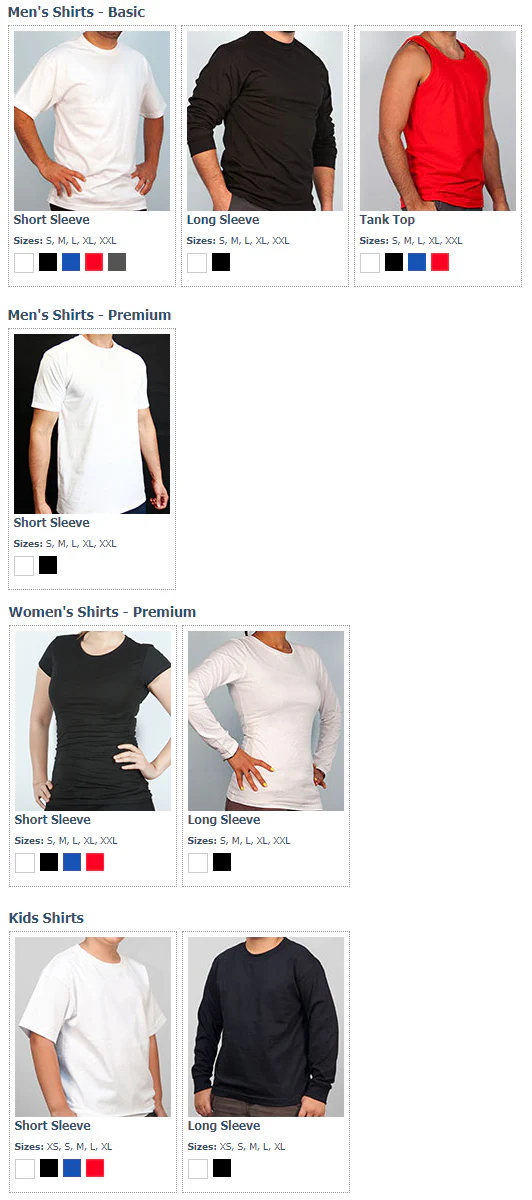
Please note: We also offer XXL, XXXL, XXXXL. Please reach out so we can customize your solution and provide you with the specific size guide for the brand of shirt you are ordering.
We use the CMYK+W digital printing process to print on our T-shirts for DTG. We also print direct to film (DTF) which is known to last very long. Screen printing, embroidery, and other methods are also available. For a custom solution it is best to email in.
The two available print areas that Printing Nest offers are 11” x 8.5” and 8.5” x 11” for DTG prints. For our DTF prints you can go as large as you want.
Please note: We can also print on alternate locations such as sleeves, collars, etc.
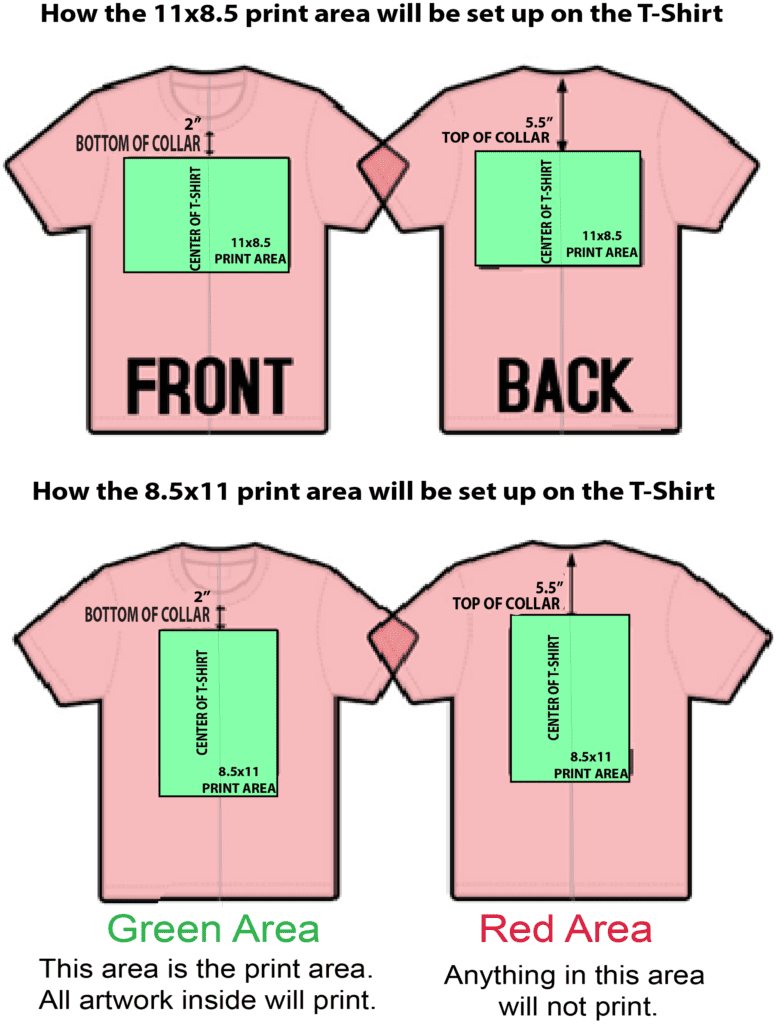
For any artwork you submit, the background must be transparent if you want the colour of the T-shirt to be the background. You can do this by saving your artwork as a transparent TIF or PDF file. You may also email an EPS file with a transparent background.
To help you setup and understand bleed rules, you can request a T-Shirt template by emailing us: sales@printingnest.com
Yes, you will need to adjust the artwork according to the youth and women’s T-shirts, as they are smaller. It should be setup vertically with a width of 8.5” and height of 11”. Files that are horizontal will not be accepted.
No, you can have the artwork set up the same as the men’s T-shirts.
The brands we provide here at Printing Nest include:
- ATC™
- Gildan®
- KOI®
- Nike®
- OGIO®
We do offer other brands just email us or visit our Printing Nest Promotional Products website.
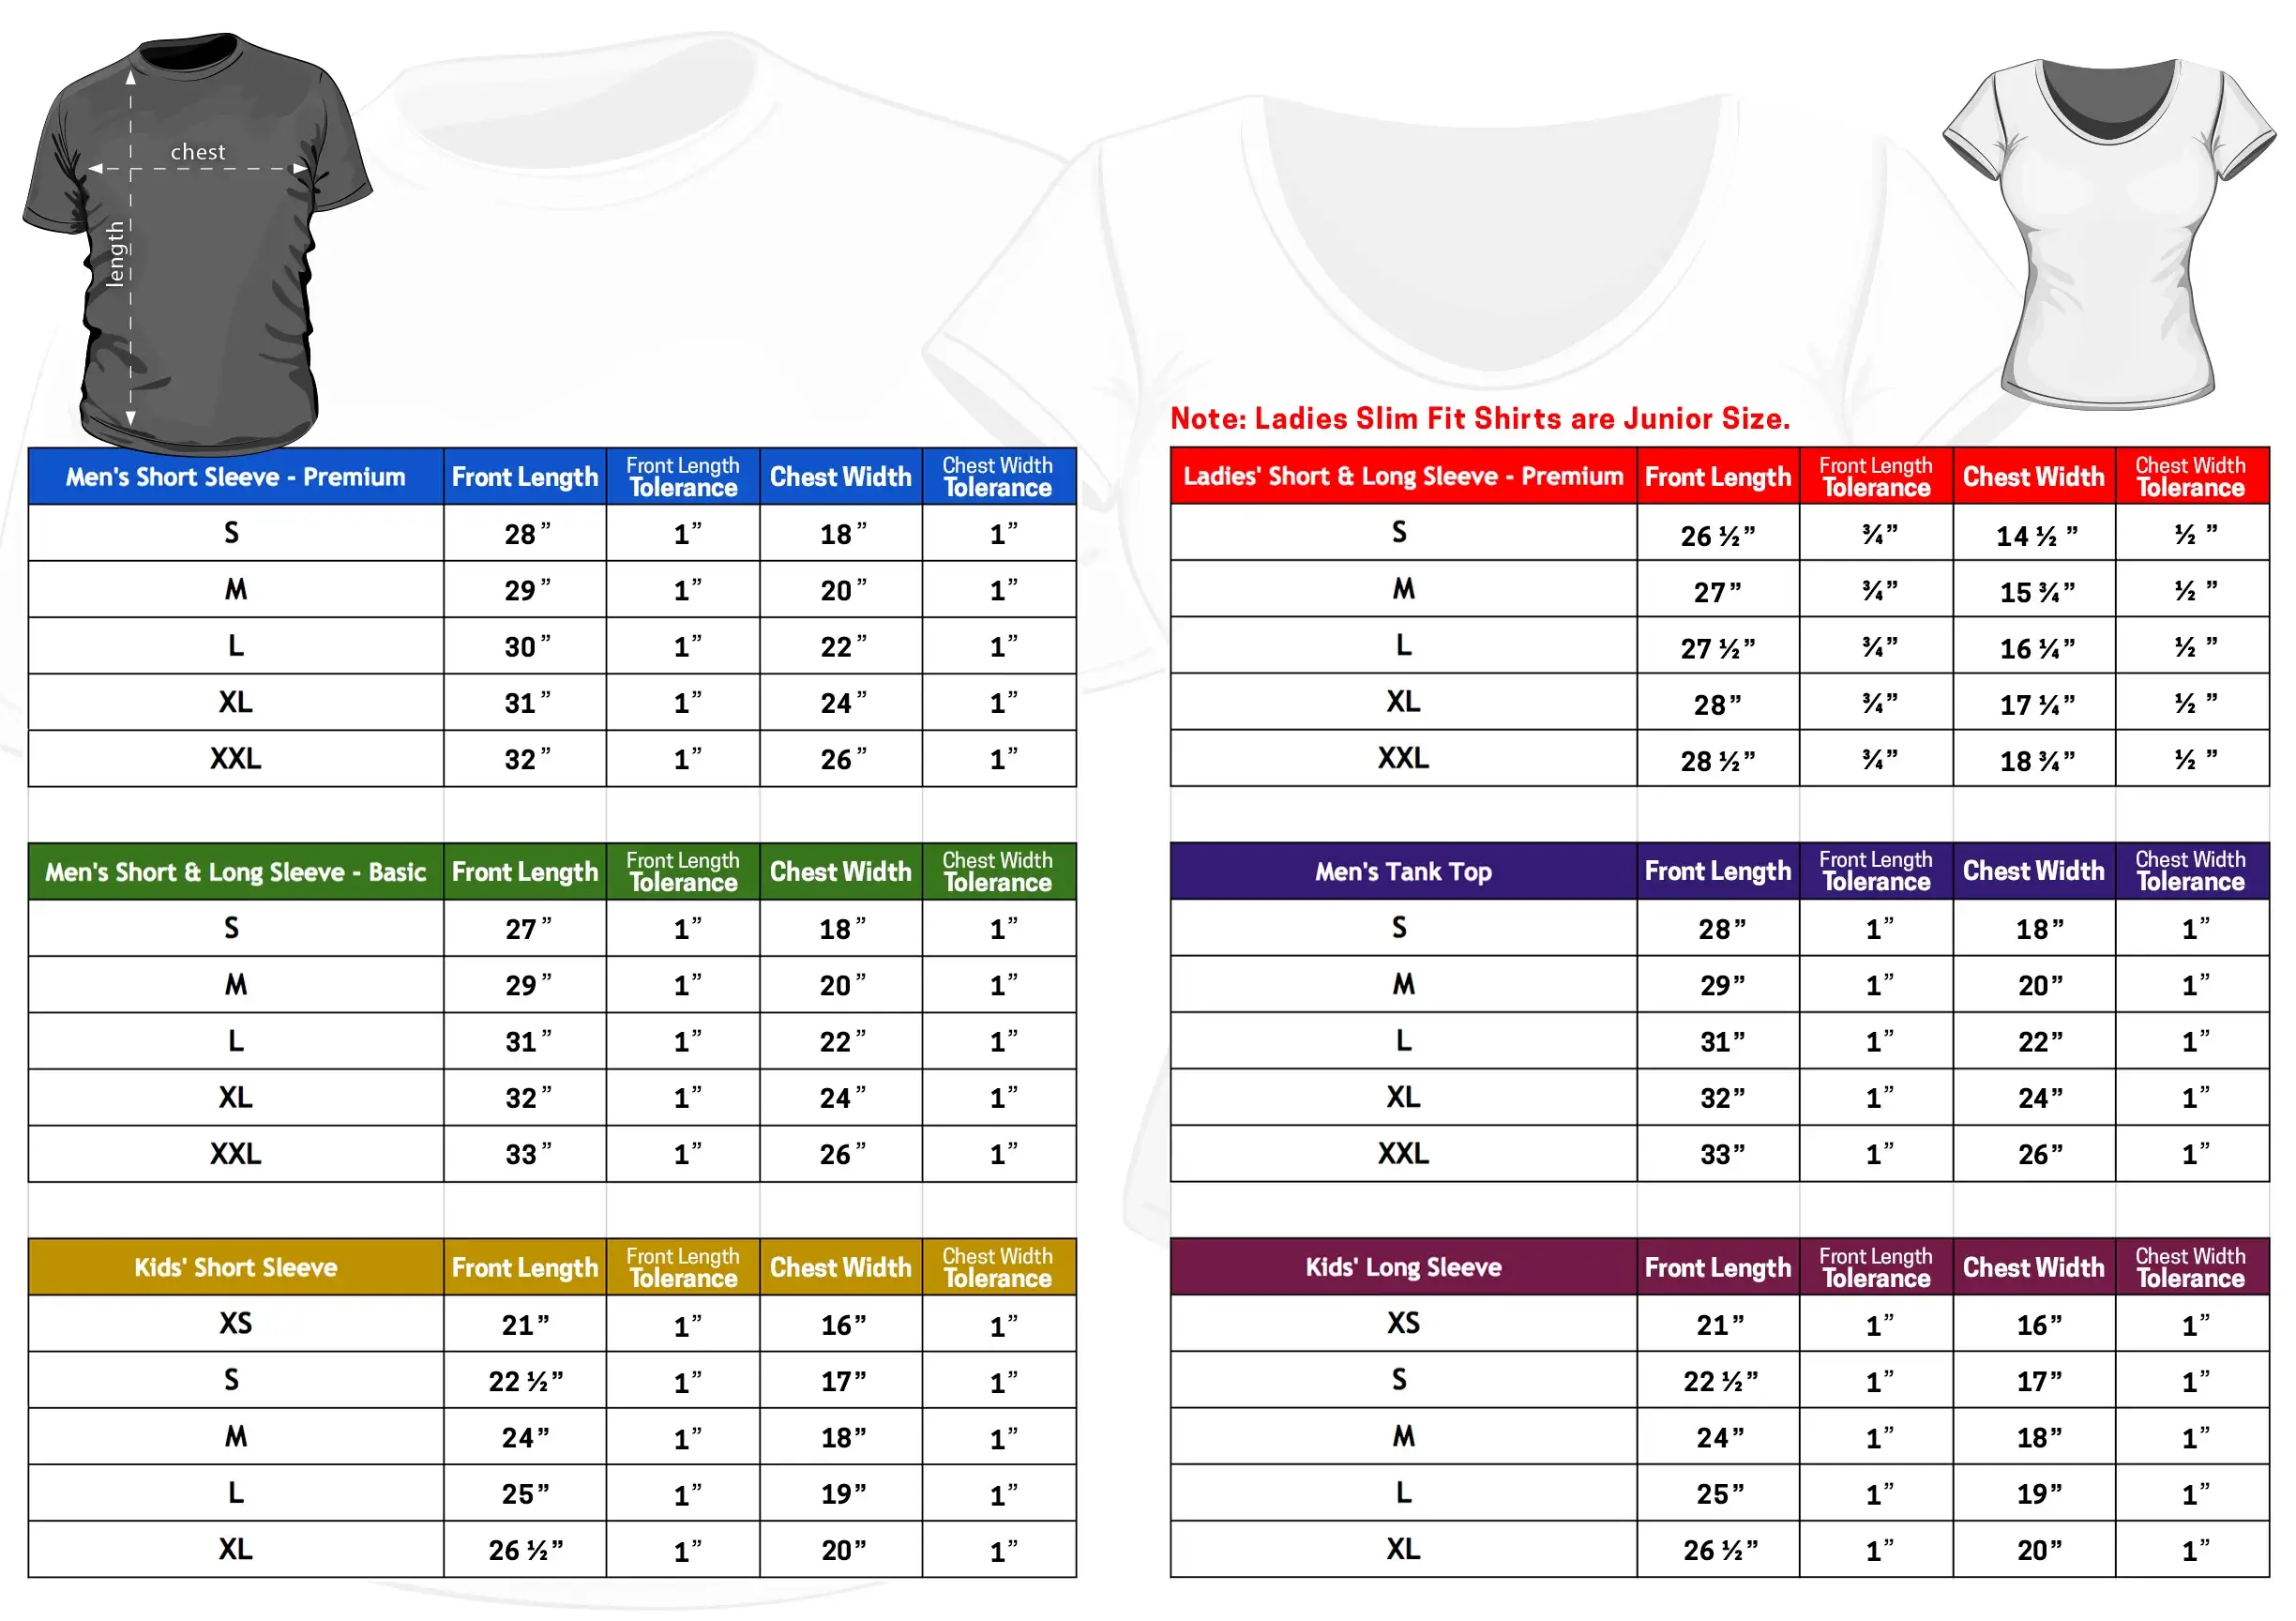
Men’s – Basic, Tank Tops and Kids’ shirts are 6.0 oz (10.0 oz Canada) and made with 100% Cotton Tubular Jersey with a double-needle bottom hem and shoulder-to-shoulder tape. Made with a Classic Fit, it is pre-shrunk to prevent any additional shrinkage. We do offer other material as well. Simply email us for more details.
Men’s Basic Short Sleeve reference: ATC #1000 Everyday Cotton Tee
Men’s Long Sleeve reference: ATC #1015 Everyday Cotton Long Sleeve Tee
Men’s Tank Top reference: ATC #1004 Everyday Cotton Tank Top
Kid’s Short Sleeve reference: ATC #1000Y Everyday Cotton Youth Tee
Kid’s Long Sleeve reference: ATC #1015Y Everyday Cotton Long Sleeve Youth Tee
Men’s Premium shirts are 4.3 oz (7.15 oz Canada). Made with 100% Combed Ring-spun cotton jersey. Fitted to have a set-in rib collar as well as shoulder-to-shoulder taping. Also, has double-needle sleeve with bottom hems and has been pre-shrunk to prevent any additional shrinkage.
Men’s Premium Short Sleeve reference: GILDAN #2000 Ultra Cotton® T-Shirt
Men’s Premium Long Sleeve reference: GILDAN #5400 Heavy Cotton™ Long Sleeve T-Shirt
Ladies’ – Premium shirts are 4.3 oz (7.15 oz Canada). Made with 100% Combed Ring-spun cotton jersey. Fitted to have a set-in rib collar as well as shoulder-to-shoulder taping. Also, has double-needle sleeve with bottom hems and has been pre-shrunk to prevent any additional shrinkage.
Ladies’ Premium Short Sleeve reference: GILDAN #640L Softstyle® Junior Fit Ladies’ T-Shirt
Ladies’ Premium Long Sleeve reference: ATC #8015L Ring Spun Long Sleeve Ladies’ Tee
Disclaimer: Please check with us before ordering as we change brands from time to time.
We use the CMYK digital print process for mugs.
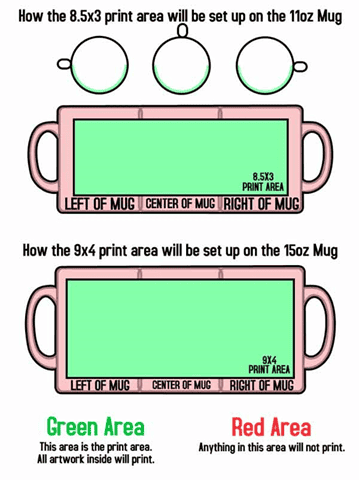
Yes, the total print area is 8.5″ x 3″ for an 11 oz. mug. It is 9″ x 4″ for a 15oz. mug. The artwork will then be centered and wrapped along the mug. You can have a left, right, or center print if you position your artwork accordingly on the 8.5″ x 3″ document.
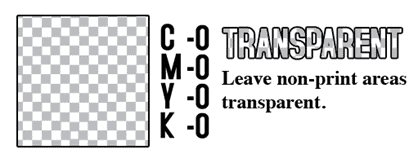
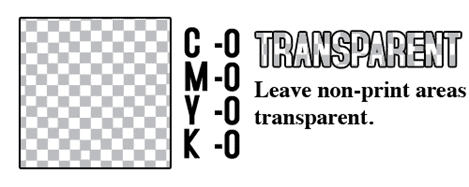
For a white mug, you should set the background colour to C-0 M-0 Y-0 K-0. The white colour background for white mugs will be disregarded.
To help you setup and understand bleed rules, you can use the online mug templates that are available on our website.
We provide an eco-friendly 100% cotton Tote Bag. It is made with a 6 oz canvas cotton material that is also reusable and washable. It has dual fabric straps that provide convenient and comfortable wear.
No, if you want the background of the bag to show, the background colour of your artwork must be transparent. You do this by saving the file as a transparent PDF of TIF file. You can also do this by sending an EPS file with a transparent background.
No, your files will not need to setup with bleed. Submit all artwork files at 9” x 13”.